Building your own multi-tone sound system from scratch is a thrilling project. Not only does it give you full control over the quality and performance of the system, but it also offers a chance to experiment and fine-tune every element to your liking. If you’ve ever wanted to design a sound system that produces rich, dynamic, and well-balanced audio, you’re in the right place! This step-by-step guide will take you through everything you need to know about building a multi-tone sound system, from the basics of sound design to the advanced technicalities of assembly.
What Is a Multi-Tone Sound System?
A multi-tone sound system is a type of audio setup designed to reproduce a broad range of frequencies simultaneously. Unlike simpler systems, which may struggle to produce a full spectrum of sound, multi-tone systems excel in delivering rich and varied audio. By dividing the sound into different frequency ranges, such as bass, midrange, and treble, these systems ensure that every note, from the deepest rumble to the sharpest high pitch, is clearly represented.
This makes them an ideal choice for those who desire a more immersive listening experience. Whether you’re an audiophile who wants to enjoy the subtleties of every instrument or a movie lover seeking the most realistic sound effects, a multi-tone system offers a richer, more nuanced experience. It’s not just about hearing sound – it’s about feeling it, as the different tones blend seamlessly to create a dynamic, full-bodied audio environment.
Such a system is also versatile. Whether you’re building a stereo system, a surround sound setup for your home theater, or even a custom public address system, multi-tone setups can be adapted to suit any environment. They allow for the precise tuning of the sound to match the specific needs of the room or performance, ensuring the best possible audio experience. Whether it’s clear dialogue, booming bass, or crisp treble, every frequency can be finely tuned to perfection.
The versatility of a multi-tone system also makes it ideal for musicians and sound engineers who need to reproduce complex audio setups. In live performances or recording environments, the ability to handle multiple sound layers at once allows for a more accurate and powerful reproduction of sound. Understanding the principles behind multi-tone sound systems is crucial for creating high-quality audio setups, whether for personal enjoyment or professional use.
Why Build a Multi-Tone Sound System?
Building a sound system from scratch offers several benefits:
- Customization: You can design the system to perfectly match your needs and preferences. Whether it’s for your home, studio, or outdoor events, you get to choose every component, from the speakers to the amplifier, to ensure it suits your exact requirements.
- Learning Experience: The process of building your own sound system offers a deep dive into the world of acoustics, audio equipment, and electronics. You’ll gain hands-on experience and develop a better understanding of how different components interact with each other to create the sound you hear.
- Cost Savings: In many cases, building your own sound system can be more affordable than buying pre-built models. By choosing your own components and materials, you can find the best balance between price and performance, saving money without sacrificing quality.
- Superior Quality: When done correctly, a custom-built sound system can outperform store-bought models in both sound quality and durability. You’ll have the flexibility to choose higher-quality parts and tailor the design to suit your listening environment, resulting in better overall performance.
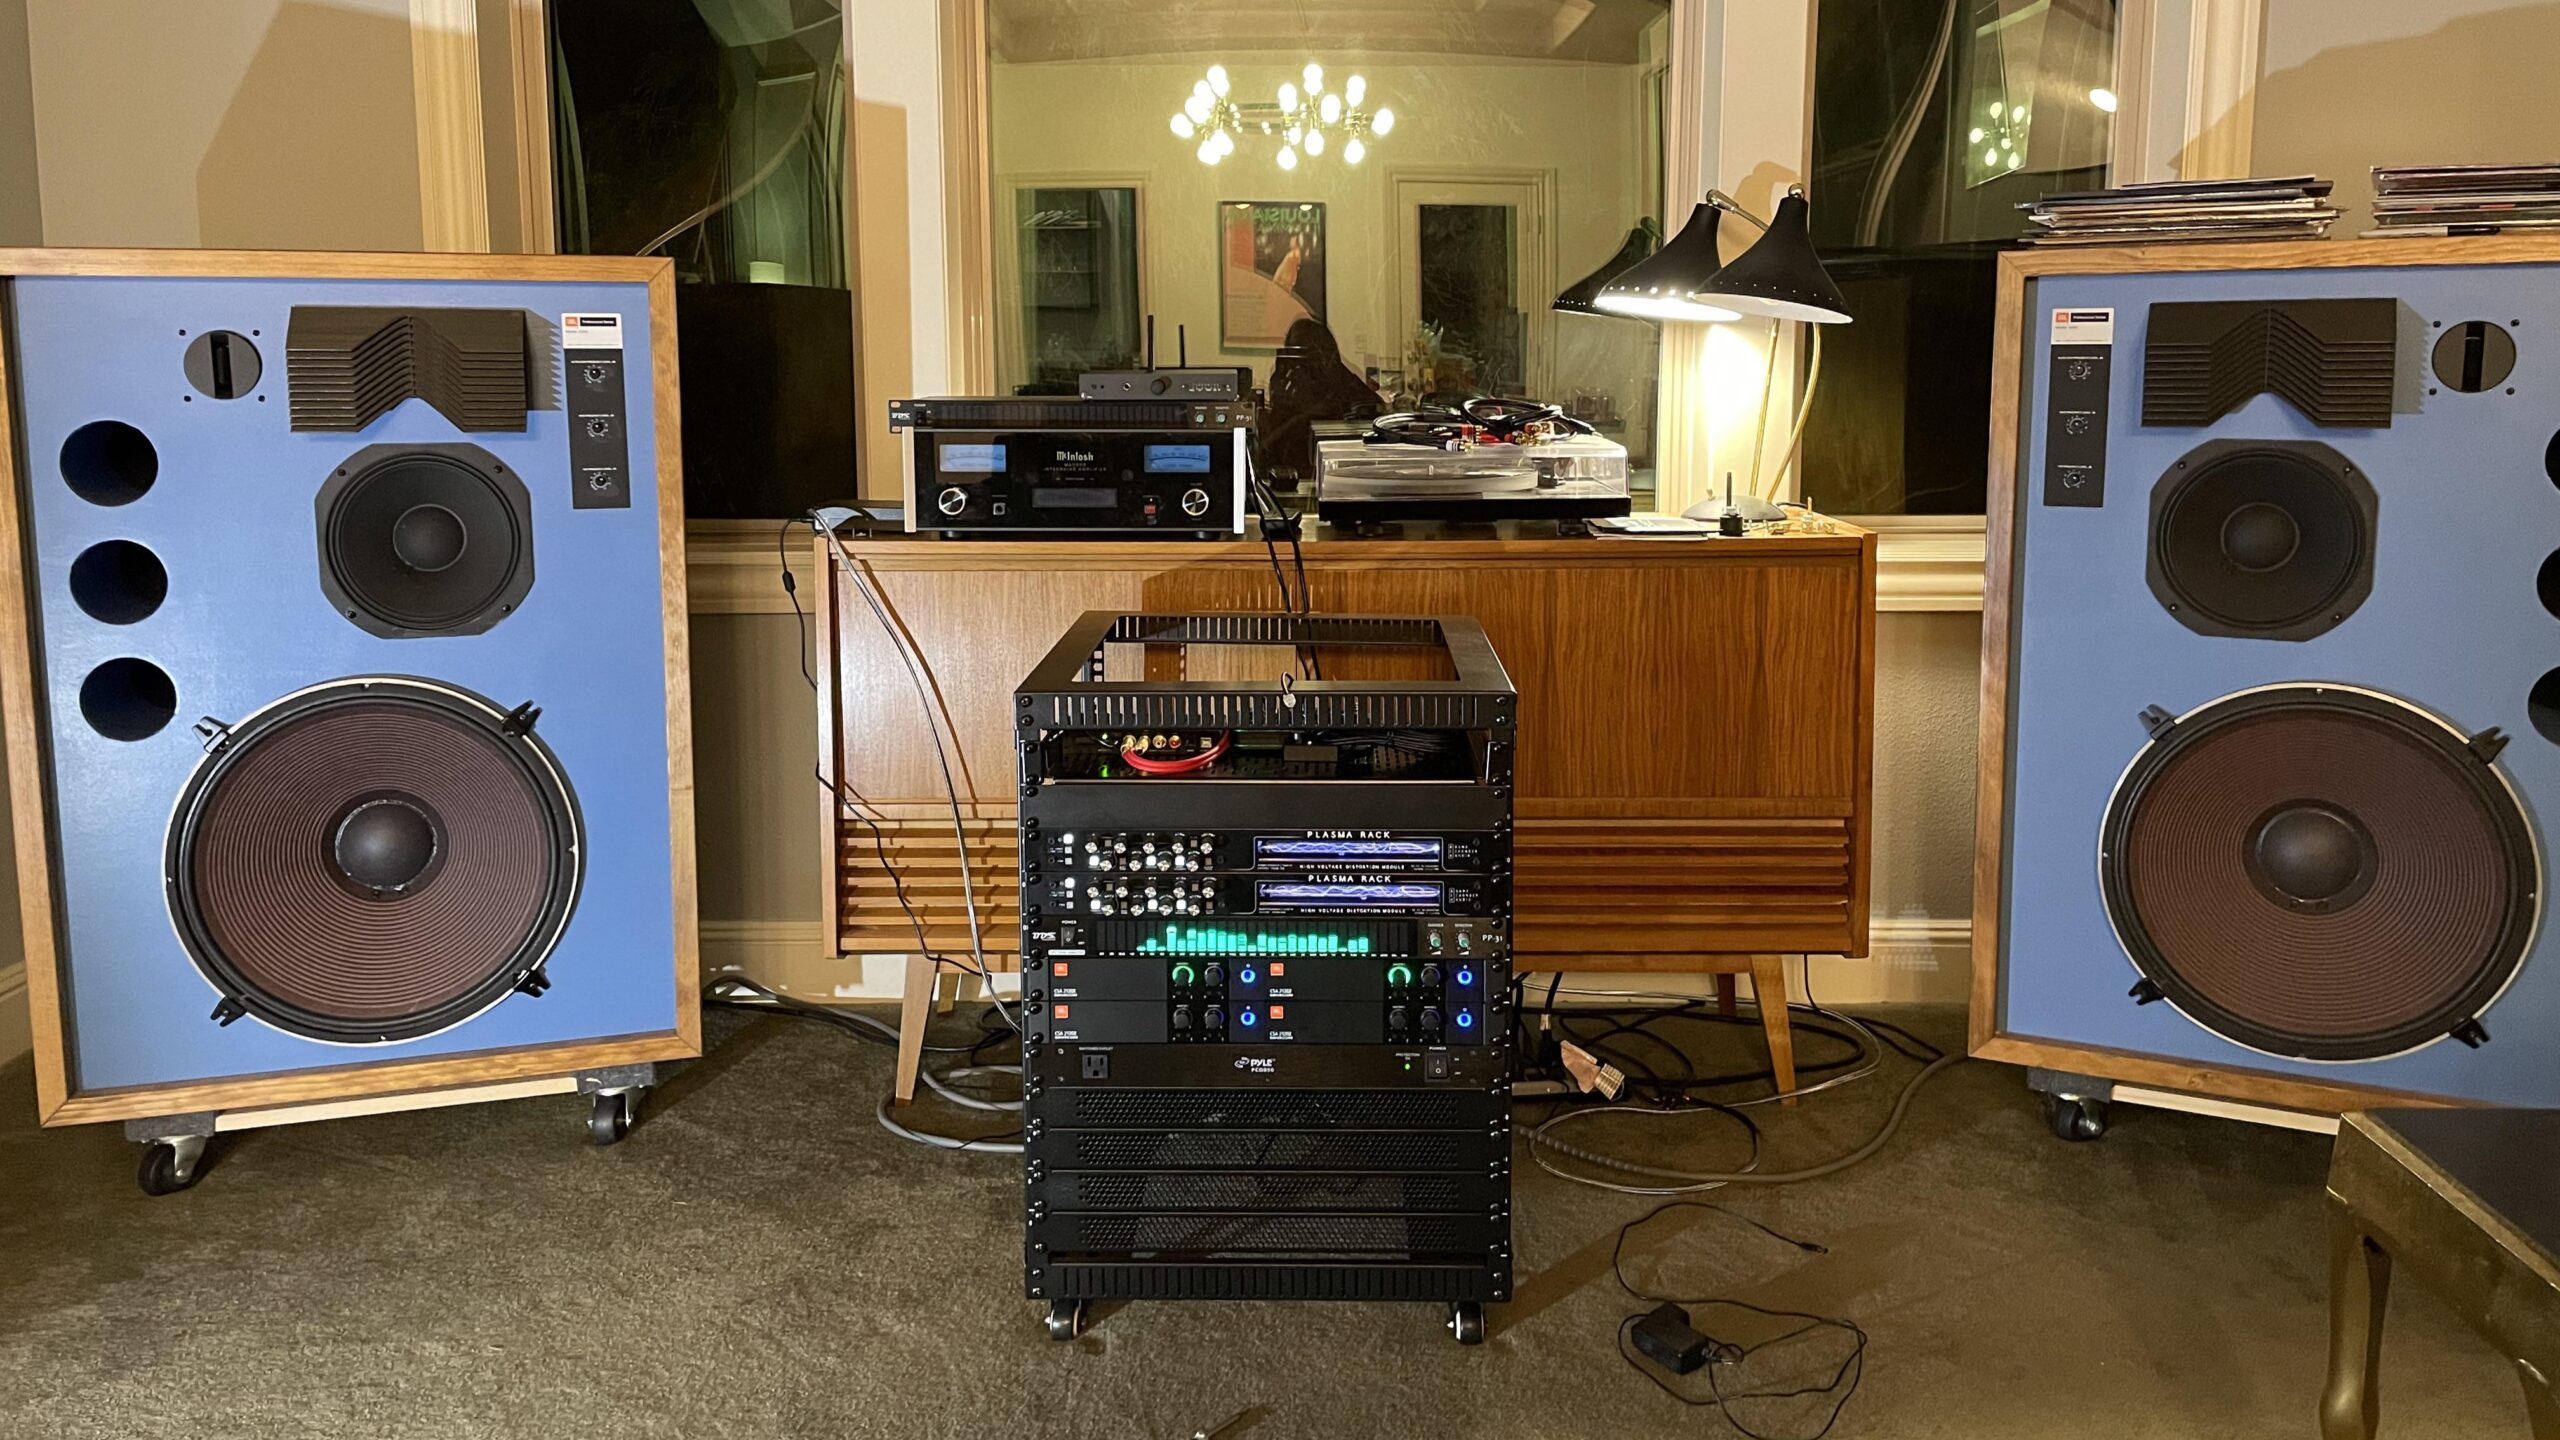
Understanding the Components
| Component | Description | Purpose | Types/Variants | Additional Information |
| Speakers | Convert electrical signals into audible sound. | They are the heart of your system, producing the actual sound you hear. | Tweeters, Midrange Drivers, Woofers, Subwoofers | The choice of speakers directly impacts the sound quality. |
| Amplifiers | Boost the audio signal to a level that speakers can handle. | Amplifiers make sure the signal is strong enough for the speakers to produce sound. | Integrated, Power, Pre-Amplifiers | Power output and impedance are key factors in choosing an amplifier. |
| Crossovers | Electronic circuits that divide the audio signal into frequency bands. | They ensure that each speaker receives the appropriate frequency range for optimal performance. | Passive, Active Crossovers | Crossovers prevent distortion by directing frequencies to the right speakers. |
| Wires and Cables | Connect all components in your system. | Wires and cables transmit the electrical signals between the amplifier, speakers, and other components. | Speaker Wires, RCA Cables, Power Cables | Quality wires reduce signal loss and interference. |
| Enclosures | Speaker cabinets that house the drivers. | They help control the sound output and enhance acoustical properties, ensuring better sound. | Ported, Sealed, Transmission Line | Enclosures impact the bass response and overall sound clarity. |
Selecting Your Drivers
The key to building a great multi-tone sound system is selecting the right drivers for each frequency range. Each driver type is designed to handle a specific range of frequencies, and choosing the right one for your setup ensures that each part of the audio spectrum is reproduced accurately. Let’s break down the considerations for each type of driver.
When selecting tweeters, material plays a significant role in the sound quality. Common materials like titanium, silk, or aluminum each have distinct characteristics. Titanium offers a crisp, sharp sound, while silk provides a smoother, warmer tone that can be more pleasant for extended listening. Additionally, the power handling of the tweeter is crucial; you’ll want one with a higher power rating to ensure it can handle the signal strength without distortion. Tweeters are usually small, typically ranging from 0.5 to 2 inches in diameter, making them ideal for high-frequency sounds such as treble.
Midrange drivers are responsible for reproducing a large portion of the audio spectrum, from vocals to instruments. The material used for midrange drivers is important for producing balanced sound. Paper, fiberglass, or metal cones are commonly used, offering a range of tonal qualities that ensure accurate representation of vocals and instruments. A quality midrange driver should cover frequencies from about 200 Hz to 2 kHz. In terms of size, midrange drivers usually range from 3 to 8 inches in diameter, striking a balance between clarity and power for mid-range frequencies.
Woofers handle the low-end frequencies, providing the deep bass and the rumbling sound that gives music its punch. Woofers are typically made from durable materials like paper, carbon fiber, or rubber surrounds to ensure responsiveness and longevity. These drivers generally handle frequencies from 40 Hz to 1 kHz, giving you the rich, deep bass that adds fullness to the sound. Woofers come in larger sizes, ranging from 8 to 15 inches in diameter, and they are essential for producing the low-frequency output that creates a full audio experience.
Choosing the Right Amplifiers
To drive your drivers effectively, you’ll need amplifiers. An amplifier boosts the audio signal to a level that the drivers can handle.
- Power Rating: Match the amplifier’s power output to the speaker’s power handling capacity to avoid overdriving or under-driving the speakers.
- Impedance: Ensure the amplifier’s impedance is compatible with the speaker’s impedance (measured in ohms). Common impedances are 4, 6, and 8 ohms. Mismatched impedances can cause distortion or damage to the components.
- Mono Amplifiers: Used for subwoofers or single channels. They are designed to power a single driver, typically a subwoofer, which requires a large amount of power.
- Stereo Amplifiers: Used for stereo setups, where two channels (left and right) are amplified separately. This is ideal for simple two-speaker setups where you want distinct channels for a more dynamic sound.
- Multichannel Amplifiers: Used for more complex systems, such as surround sound setups. These amplifiers provide multiple channels of amplification, allowing you to power several speakers for a surround-sound experience.
Crossovers and Filtering
| Component | Description | Purpose | Types of Crossovers | Additional Information |
| Crossovers | Devices that direct the appropriate frequencies to the right drivers. | They ensure that each driver (tweeter, midrange, woofer, subwoofer) only receives the frequencies it’s designed to handle. | Passive, Active | Without crossovers, drivers might be overwhelmed with incorrect frequencies. |
| Passive Crossovers | No external power required; uses capacitors and inductors to divide frequencies. | They divide the audio signal into frequency bands, sending each band to the appropriate driver. | Capacitors, Inductors | Simpler design but may not offer as much precision as active crossovers. |
| Active Crossovers | Require external power; uses electronic components for greater precision. | Provides more control over the filtering process, allowing for better tuning and performance. | Operational Amplifiers, Transistors | More expensive but allows for more fine-tuned control and better efficiency. |
| Tweeter-Crossover Point | Frequency range where high frequencies are separated from midrange and bass. | Typically set between 2-5 kHz to ensure tweeters only handle high frequencies. | 2-5 kHz | Ensures tweeters don’t handle low frequencies, preventing distortion. |
| Midrange-Crossover Point | Frequency range for separating midrange sounds from high and low frequencies. | Typically set around 200 Hz to 2 kHz, this allows midrange drivers to handle vocals and instruments. | 200 Hz to 2 kHz | Helps balance midrange sound, avoiding strain on either the woofers or tweeters. |
Assembling Your Sound System
Once you have all the components, it’s time to put them together. Assembling a multi-tone sound system requires careful attention to detail to ensure everything works harmoniously. The first step in assembly is wiring the drivers to the crossover networks. Crossovers are crucial in directing the correct frequencies to the appropriate drivers, so it’s essential to ensure each driver is connected to the correct band of frequencies. Once the wiring is in place, the next task is to securely mount the drivers and crossovers inside the speaker enclosures. The enclosures not only protect the internal components but also influence the overall sound quality, so proper installation is key. Finally, connect the amplifiers to the system inputs, ensuring that the power output matches the needs of the components to avoid distortion or damage.
The design of the speaker enclosures plays a significant role in achieving the desired sound quality. The material you choose for the enclosures affects both durability and acoustic performance. MDF (medium-density fiberboard) and plywood are commonly used materials because of their sturdiness and ability to minimize resonance, helping to create a more accurate sound. The size of the enclosure is equally important, as it directly impacts the bass response. An enclosure that is too small or too large for the driver can result in distorted or weak bass. Consider the recommended size specifications for your particular drivers to ensure optimal sound performance.
When deciding on the type of enclosure, you’ll have to choose between a sealed or ported design. Sealed enclosures provide a tight, controlled bass response but may not produce as much low-end power as ported enclosures. Ported enclosures, on the other hand, allow for more bass output due to the addition of a port or vent, but they require precise tuning to avoid distortion. Deciding which type to use depends on your sound preferences and the type of system you are building. A well-tuned ported enclosure can add depth to your sound, but improper tuning can lead to muddiness.
Wiring everything together is another crucial step in the assembly process. Use high-quality speaker wire to connect the amplifiers to the crossovers and from the crossovers to the speakers. It’s important to use the right gauge wire to ensure minimal resistance and maintain signal quality. Ensure all connections are tight and secure to prevent any loss of signal or unwanted distortion. Loose connections can lead to poor sound quality and even damage your equipment over time, so double-check each connection before powering up your system. Once everything is properly wired and mounted, your multi-tone sound system will be ready to deliver high-quality, immersive audio.
Testing and Tuning Your System
- Start at Low Volume: Begin by testing your system at a low volume to ensure all components are functioning correctly and that there are no immediate issues with the wiring or connections.
- Gradually Increase Volume: Slowly increase the volume to check for distortion or any other sound problems that might arise at higher levels.
- Listen for Distortion or Rattling: Pay close attention to any distortion, rattling, or imbalanced sound. These could indicate problems with speaker placement, wiring, or even the drivers themselves.
- Make Necessary Adjustments: If you notice any issues, stop the test and make adjustments to the system. This could include fixing wiring, adjusting crossover settings, or moving speakers to different locations.
- Use an Equalizer (EQ): Use an equalizer to fine-tune the frequency response of your sound system. Make sure the treble, midrange, and bass are well-balanced according to your preferences.
- Optimize Room Acoustics: Use a sound meter to assess room acoustics and optimize speaker placement. This ensures that the sound is clear and evenly distributed across the space.
- Check Phase Alignment: Verify that the phase alignment between drivers is correct. Incorrect phase alignment can lead to cancellation of certain frequencies and poor sound quality.